Showing posts with label kitchen aid. Show all posts

Saturday, March 24, 2012

How to make your own breakfast sausage

Oh my gosh!! I just made the BEST breakfast sausage.  I've made Italian sausage before that turned out just fine, but this...this...breakfast sausage is seriously, the best I've ever tasted.  (My husband says I say that all the time, but this time it's true).
It doesn't hurt that I have the best or rather had the best source available for my pork...Fehringer Farms.  (I'm so sad in so many ways to have left them behind in Sidney as we recently moved to Arizona.)

Making your own sausage is really easy and the better the ingredients, the better the taste. The herbs I used were what I grew and dried myself. The pepper I used is an amazing pepper blend that I got from Ricky and Lucy's Greenhouse. It's their Smokey Spicy Pepper Blend and it was PERFECT in this recipe.  I started with Alton Brown's recipe for breakfast sausage and then used what I had.
Kelly's Breakfast Sausage Recipe
Ingredients:
1 lb. fresh ground pork
1 tsp. kosher salt
1 tsp. dried sage
1 tsp. dried thyme
1/2 tsp. Ricky and Lucy's Smoky Spicy Pepper Blend
pinch freshly grated nutmeg
1/2 TBSP. brown sugar

Add all ingredients to mixing bowl and blend on low for 1-2 minutes.  Form into patties and fry in a non-stick frying pan on medium heat.

Cook a test patty and taste, then adjust your seasonings as needed.  I didn't need to adjust mine at all from the above recipe. Some may prefer a little more salt.
Try it!  Your homemade sausage will not taste like Jimmy Dean if that's what you're looking for, but if you want a great tasting sausage without preservatives or fillers, then try it at home.  I think you'll love it.
Till later,
Kelly

Saturday, February 19, 2011

10 Things I've learned about baking bread...

10 important things I’ve learned about baking bread…

  1. A good bread making book by an expert bread maker will make a huge difference in your skills, if you read it, that is.
  2. A Kitchen Aid is a God-send when you’re learning to knead.  If your recipe says to knead your bread for 10 minutes then you can turn your kitchen aid on to a medium low speed with the dough hook on and let it work its magic for 10 minutes.  Your bread will be kneaded satisfactorily.  Check for the “baker’s window”* to see if it’s done.  Allowing the Kitchen Aid to do the kneading for me, allowed me to understand what fully kneaded bread looked and felt like.
  3. When my Kitchen Aid stopped working, I became an even better bread maker.  If you want to make a better loaf, knead by hand.  I followed the kneading advice of an expert bread maker (from his book) and found that when I knead by hand, my bread has uneven holes which is what I prefer.
  4. Start with pizza dough. You’ll be wasting fewer ingredients if you mess it up.  And you can still use it even if it doesn’t rise properly.
  5. Perfect a loaf of white bread, then attempt wheat.  Using whole wheat can be a little tricky; you’ll feel better if you ease yourself into it.
  6. Once you can REALLY bake a good loaf of white bread, you can bake dinner rolls, which is just kind of fun.
  7. Don’t give up! You CAN learn how to make a good loaf of bread with a little practice.
  8. A pan of water in the bottom of your oven during baking creates a lovely crispy crust on French and Italian breads. Spritzing the bread and the oven is totally unnecessary.
  9. Always read the recipe thoroughly, all the way to the end, BEFORE beginning.
  10. Yeast is very sensitive. 
*A baker's window is a thin window pane of dough that is created when you stretch a small handful of dough.  If the window pane is created (you can almost see through it) before the dough breaks, then you have kneaded the dough long enough.
Baking bread is very rewarding.  If you want to learn how to bake bread, buy a book and start practicing. 
Thanks for stopping by today!
Kelly
This is the book I read and highly recommend!  See if your local library has it and read a bit and even try a recipe before you buy.  Then you'll know it's worth adding to your own library.

Friday, July 2, 2010

First Loaf Recipe - Bread Recipe

Here's the recipe for the first loaf of successful bread with photos.  The day after I made these loaves, I tried a buttermilk whole wheat recipe that also turned out terrifically...soft, not crumbly, good taste...a keeper recipe!  I'll share that recipe later.  I hope the photos help!

Ingredients:
5 to 6 cups bread or all-purpose flour, approximately
3 Tbsp. sugar
2 tsp. salt
1 package dry yeast
1/4 cup nonfat dry milk
2 cups hot water (120 - 130 degrees F)(you really should use a thermometer)
3 Tbsp. shortening, room temperature
This recipe is for 2 loaves of bread baked in medium bread pan (8 x 4 inches).  The directions are for using a Kitchen Aid to mix and knead.

In your mixer bowl combine 2 cups flour, sugar, salt, yeast, and dry milk. 
Pour the hot water into these dry ingredients and beat with the paddle attachment to blend thoroughly.


Add the shortening and continue beating until well combined.

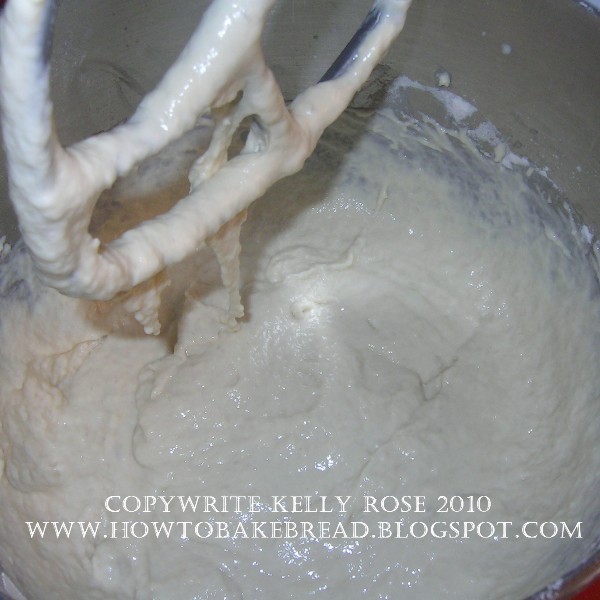
Add 1 cup flour and beat for 3 minutes at medium speed.


It helps to actually set your timer for these blending times. Smile.
The photo above is after the 3 minutes.  See the "stringy" effect?  The gluten strands are beginning to form.

Add the flour, 1/4 cup at a time until the dough forms a soft, elastic ball around the dough hook attachment. I have included all the progressive photos of this bread making step so you can see the dough as the flour is added.


After it gets to the stage where the dough has cleaned the sides of the bowl thoroughly and is not sticky to the touch, you can begin kneading.  Set your timer for 10 minutes.  I have to stand next to my mixer because my mixer starts to dance across the counter.

The photo directly above shows the kneaded dough.  You should be able to stretch the dough for quite a ways and it will become almost paper thin before breaking.  If your dough was soft enough, this is what it should look like. Bernard Clayton says that to test your dough to see if you've kneaded enough, put the dough on a flat surface, slap your hand onto the dough and count to 10.  You should be able to remove your hand without any dough sticking to it.
Now place the dough in a lightly greased bowl, cover tightly with plastic wrap and leave at room temperature until the dough has doubled in bulk.


Now punch down the dough to remove large air bubbles.  Remove dough to a cutting surface and cut into 2 equal balls.  Let these rest for 3 minutes.

Form the loaves by flattening the balls into ovals slightly longer than the pans.

Fold the sides under and pinch together.  You'll see on my bread what happens if you don't pinch thoroughly enough. Tuck the ends of the dough under and pinch.

Place the shaped loaves into greased pans and cover with waxed paper for the 2nd rise.  Preheat the oven to 400 degrees F about 20 minutes before baking.  The second rise will take about 45 minutes to an hour.

Here's what it should look like!

Bake at 400 degrees F for 10 minutes, then lower the oven heat to 350 and continue baking for an additional 25-30 minutes.  Halfway through the baking, turn the pans 180 degrees inside the oven so they bake uniformly.

Cool on a wire rack. Aren't they beautiful!

And there's my hole from not pinching carefully enough.
This is excellent bread...not too big on taste, but is soft and hold together really well.
I'm excited to share the whole wheat recipe with you as it tastes much better and comes out looking just as beautiful.  Till then!  Thanks for stopping by!  Kelly
Thank you Mr. Clayton!

Thursday, June 24, 2010

Kelly’s Peanut Butter Oatmeal Chocolate Chip Ranch Cookies

I’ve been looking for a cookie recipe for some time that used whole wheat flour and oatmeal. I found one by Mrs. Fields (Peanut Butter Oatmeal Ranch Cookies) that included whole wheat, oats, peanut butter, honey, sunflower seeds and raisins. AND it only used one stick of butter instead of the usual 2 sticks. You can find her original recipe in the Mrs Fields Cookie Book. And according to what I saw, you can get this book on Amazon for one cent!  Ah!  And she has some fabulous recipes in there!  I find that I'm always adding salt to her recipes...but what do I know? She's the millionaire cookie maker, not I.


My husband has high cholesterol, so I want to feed him as many oats and whole grains as possible. I really like the idea of only one stick of butter for that reason as well. I’m also a little stingy with my butter so a cookie recipe that tastes good and doesn’t use half my butter at once is a GREAT thing!

These cookies are not decadent, but they’re very good, and make a great “lunch bag” addition for my husband. He’s also the reason used chocolate chips in place of the raisins.  So here's my "tweaked" recipe.


Ingredients:
¾ cup Whole Wheat Flour
¾ cup all purpose flour
½ tsp. baking POWDER
½ tsp. salt
1 cup oats (old fashioned or quick)
1 cup dark brown sugar, packed
½ cup salted butter, softened
½ cup crunchy peanut butter
1/3 cup honey
2 large eggs
2 tsp. pure vanilla extract
½ cup sunflower seeds
1 cup semi-sweet chocolate chips

Preheat oven to 300° F.

Combine flours, baking powder, salt and oats in a bowl with a wire wisk and set aside.

In the bowl of your kitchen aid mixer, beat sugar and butter at medium speed to form a grainy paste. Add the peanut butter, honey, eggs and vanilla. Blend thoroughly.

Add the flour mixture, sunflower seeds and chocolate chips. Blend at low speed until combined. Be cautious not to overmix.

Drop the cookie batter by rounded tablespoonfuls onto ungreased baking sheets, 2 inches apart. Bake for 23-25 minutes until bottoms turn golden brown. Immediately transfer cookies with a spatula to a cool flat surface. © Kelly Rose 2010

Notes: I love, love love, my kitchen aid.  I've been dreaming of the meat grinder attachment. Every kitchen needs a kitchen aid...every cook, needs a kitchen aid, but truly, I would NOT be baking bread with out it.  I do NOT knead by hand, and I don't intend to start. Don’t eat these cookies when they’re hot, they fall apart too easily. Don’t overbake, because with the whole wheat, they get hard in a hurry if you don’t watch the time. Hint: Always put the timer a minute or two lower than recommended to check the cookies along the way to the finish line. That way, you’ll know exactly how long to bake YOUR cookies. Everyone’s oven and altitude is different. And again, these are not melt in your mouth decadent cookies..they’re good, and you can feel good about serving a cookie packed with healthy ingredients and lower fat content. But don’t be misled, this is not the place where you will always find healthy and low fat recipes. This is all about stuff I like.
The whole wheat I used in this recipe was from a friend of mine. We’re trading a bag of her locally grown organic whole wheat flour for one of my new Stampin’ Up! catalogs. Smile! I already have my flour, she doesn’t get her catalog until the new ones come out in July. Interested? Check my Stampin Up! website blog for info on getting yours!

Let me know what you think of the recipe...
Kelly