Ingredients:
5 to 6 cups bread or all-purpose flour, approximately
3 Tbsp. sugar
2 tsp. salt
1 package dry yeast
1/4 cup nonfat dry milk
2 cups hot water (120 - 130 degrees F)(you really should use a thermometer)
3 Tbsp. shortening, room temperature
This recipe is for 2 loaves of bread baked in medium bread pan (8 x 4 inches). The directions are for using a Kitchen Aid to mix and knead.
In your mixer bowl combine 2 cups flour, sugar, salt, yeast, and dry milk.
Pour the hot water into these dry ingredients and beat with the paddle attachment to blend thoroughly.

Add the shortening and continue beating until well combined.
Add 1 cup flour and beat for 3 minutes at medium speed.
It helps to actually set your timer for these blending times. Smile.
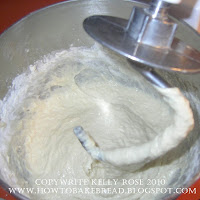
The photo above is after the 3 minutes. See the "stringy" effect? The gluten strands are beginning to form.
After it gets to the stage where the dough has cleaned the sides of the bowl thoroughly and is not sticky to the touch, you can begin kneading. Set your timer for 10 minutes. I have to stand next to my mixer because my mixer starts to dance across the counter.
The photo directly above shows the kneaded dough. You should be able to stretch the dough for quite a ways and it will become almost paper thin before breaking. If your dough was soft enough, this is what it should look like. Bernard Clayton says that to test your dough to see if you've kneaded enough, put the dough on a flat surface, slap your hand onto the dough and count to 10. You should be able to remove your hand without any dough sticking to it.
Now place the dough in a lightly greased bowl, cover tightly with plastic wrap and leave at room temperature until the dough has doubled in bulk.
Now punch down the dough to remove large air bubbles. Remove dough to a cutting surface and cut into 2 equal balls. Let these rest for 3 minutes.
Form the loaves by flattening the balls into ovals slightly longer than the pans.
Fold the sides under and pinch together. You'll see on my bread what happens if you don't pinch thoroughly enough. Tuck the ends of the dough under and pinch.
Place the shaped loaves into greased pans and cover with waxed paper for the 2nd rise. Preheat the oven to 400 degrees F about 20 minutes before baking. The second rise will take about 45 minutes to an hour.
Here's what it should look like!
Bake at 400 degrees F for 10 minutes, then lower the oven heat to 350 and continue baking for an additional 25-30 minutes. Halfway through the baking, turn the pans 180 degrees inside the oven so they bake uniformly.
Cool on a wire rack. Aren't they beautiful!
And there's my hole from not pinching carefully enough.
This is excellent bread...not too big on taste, but is soft and hold together really well.
I'm excited to share the whole wheat recipe with you as it tastes much better and comes out looking just as beautiful. Till then! Thanks for stopping by! Kelly
Thank you Mr. Clayton!


looks so good!
ReplyDelete